


9 Easy Yoga Poses for Beginners
So, you’re thinking about taking up yoga?
Maybe you feel a bit overwhelmed by seeing experienced yogis twist this way and bend that way and you’re not sure if you can pull it off?
Well, just remember, they had to start somewhere. And there’s no better way to start than at the beginning. So, take your yoga mat and let’s get going!
There are over 300 positions in yoga, and we’re sure you’ll master them all at some point. But, for now, be content with the simple poses that every beginner should learn. Here is our pick of the best yoga poses for a beginner.
The Benefits of Yoga
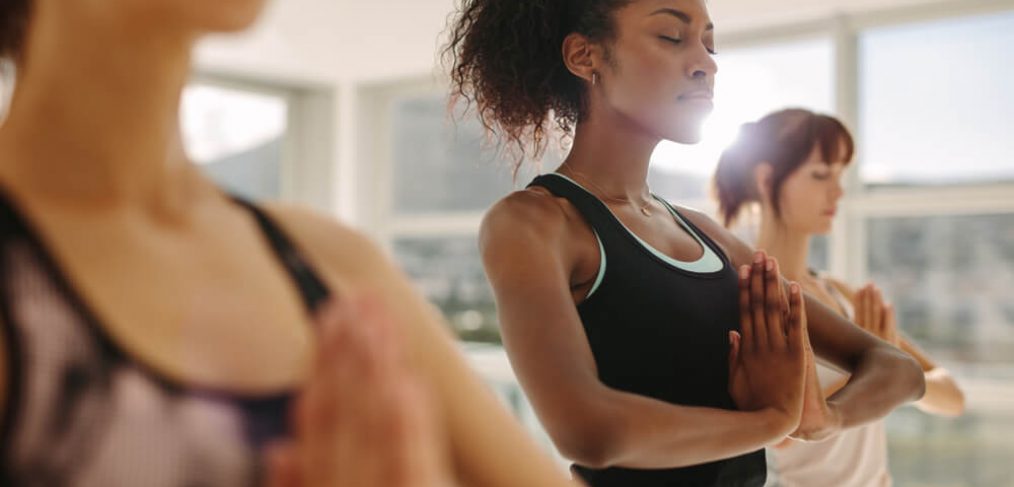
In general, and everyone will tell you this – yoga is a way of life. Not only does it help you work on your body, but it also helps soothe your mind. It is a culture of well-being that can truly improve your life in many ways.
Now, this makes it seem like yoga is some kind of superman among various practices.
And you know what?
It kind of is.
While it can’t, admittedly, fly you to the moon or save you from a villain (unless we count the metaphorical sense), there are great many things yoga can do:
- Reduce stress. Many yoga methods are interlinked with meditation, helping you “quiet down” the incessant clamoring of your mind. In turn, yoga relieves stress and relaxes even the most stressed individual.
- Increase flexibility. One of the main points of yoga is that it gradually stretches your muscles, ligaments, and tendons, increasing the range of motion in your joints. This allows you to practice further poses and, who knows, become a yogi yourself one day!
- Help with weight loss. In general, while the main purpose of yoga is not to lose weight, it is, however, one of its main benefits. As you balance your mind, you will also learn ways to balance your body, helping you lose weight or maintain a healthy weight.
- Improve posture. Because of all of the above, another great advantage of yoga is that now, your abdominal and back muscles can support your weight. As a result, your posture will greatly improve.
Yoga Poses for Beginners
As previously said, when you start doing yoga, your body will start undergoing change which will improve your overall agility.
Agility, that you can later use to increase the difficulty of your yoga poses.
But, for now, here are the easiest ones, perfect for beginners.
The Easy Pose (Sukhasana)

It makes sense to start here.
The easy pose is great for beginners and, even though it’s easy, it has plenty of benefits. It’s simply divine for your peace of mind and, also, for your back muscles and your spine.
- Sit with your buttocks firmly on the floor.
- Cross your legs, but make sure to place your feet directly below your knees.
- Put your hands on your knees.
- Press your hips down into the floor and drop your shoulders down and back. Press your chest forward.
- You should also relax your face, jaw and stomach.
- Breathe deeply through the nose and hold for as many breaths as you like.
If you have knee or back injuries, you should sit on a folded blanket to remove the strain. In
general, yoga is recommended for dealing with back pain. If some poses are too difficult, they can always be modified.
Another great way to remove the strain this pose can cause to beginners is to lean back on a wall or, possibly, lean slightly forward.
The Mountain (Tadasana)
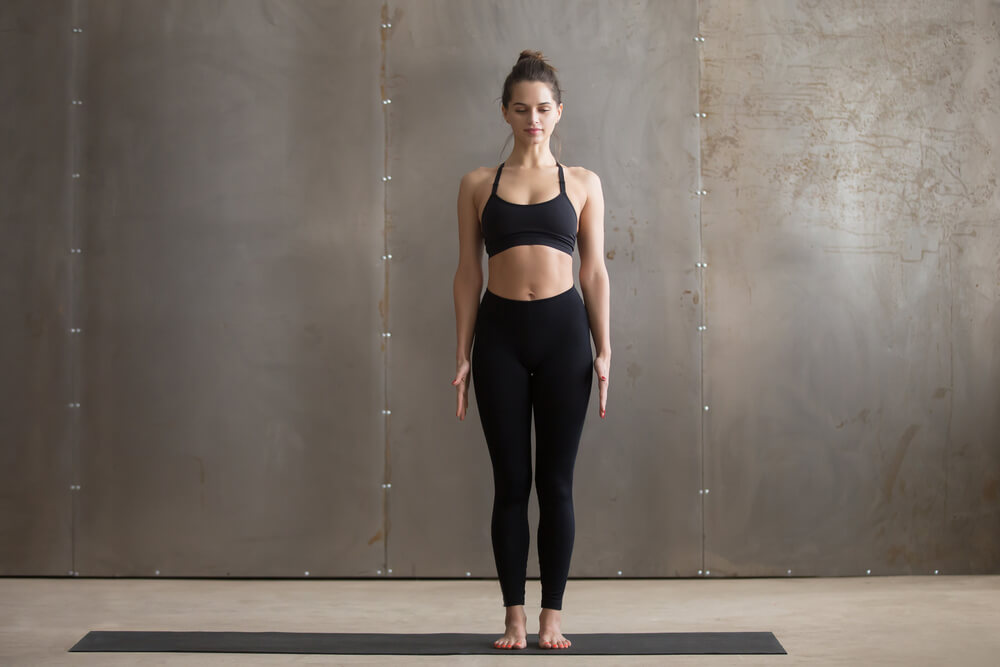
This is the basic pose for all standing poses. It is perfect for beginners, because it represents a foray into the point of yoga – learning how to ground yourself.
It may seem easy, but it’s important that you do it right.
While doing the mountain pose, keep the idea of balance in mind, since this is an essential part of yoga.
- Stand with your feet together, press down with your toes and spread them open. Draw your abdominal muscles in to engage your core.
- Then, lift your chest and roll your shoulders back and down, all the while keeping them relaxed. Drop your tailbone a bit to lengthen your lower back
- You should always take slow and deep breaths through your nose. Hold the pose for as many breaths as you like.
Precisely because it is such an easy pose to do, you can do it practically anywhere and anytime, whenever you feel like you could benefit from the balance the pose brings.
The Downward-Facing Dog (Adho Mukha Svanasana)

One of the biggest benefits of this pose is that it strengthens your entire body, while also stretching it. This is easily one of most widely recognized yoga poses.
However, it’s vital to do it right.
Here’s how to do it:
- Get down on your hands and knees. Your knees should be directly below your hips, and your hands should be slightly forward from your shoulders.
- Spread your palms and turn your toes under.
- While you exhale, you should lift your knees away from the floor. Keep your hips back and try to straighten your legs as much as you can. If your hamstrings are too tight, keep your knees bent a bit. If needed, you can also walk your hands forward. This will give you additional length.
- Press your palms firmly on the floor and rotate your inner elbows towards each other.
- Take long and deep breaths through your nose and, if you can, hold for 5 breaths.
The Tree (Vrksasana)
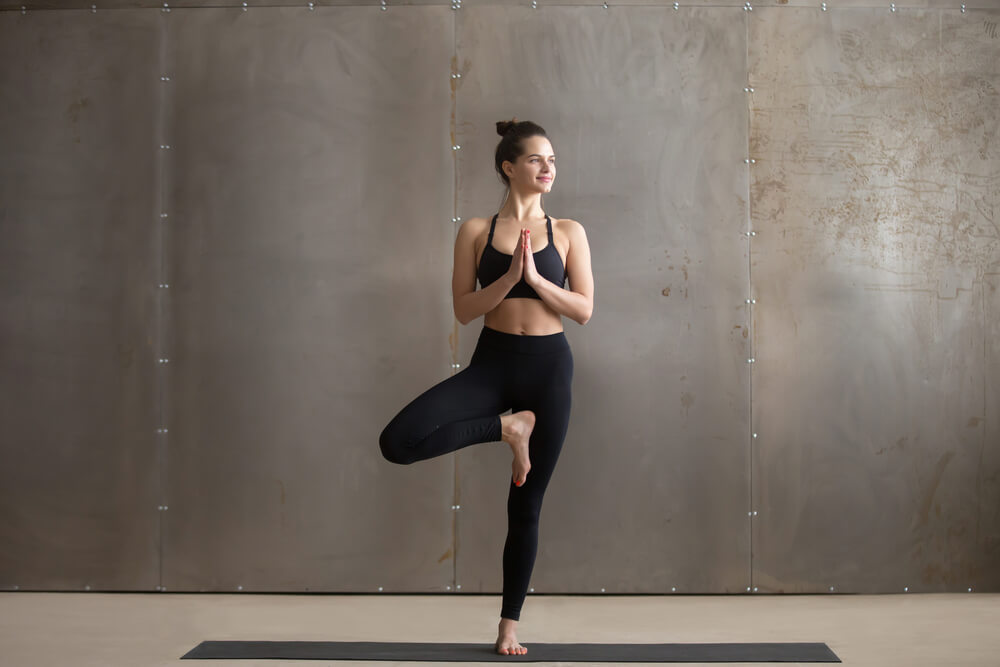
Another pose which aims at improving the balance of any beginner. It seems fairly simple – standing on one leg, right?
Well, not quite.
Even though it is easy to learn, it can be challenging for your hips, ankles and feet.
That is why you should always do everything at your pace and set realistic goals.
It is said that a good tree pose in the morning does wonder for curbing anxiety and stress, as well as increasing concentration.
- Start in mountain pose. Keep your toes together and your heels slightly apart.
- Then, shift your weight onto the left foot. Keep that foot firmly on the floor.
- Bring your right foot up to the inner thigh and squeeze them together. If you’re having trouble drawing your foot up, simply reach down with your right hand and help it along the way. Toes of your right foot should be facing downwards, while the knee should be turned out.
- When you’ve found your balance, press your hands together in front of your chest and keep your gaze at a fixed point about 5 feet away from you.
- You should hold this pose for about 5 breaths, or more, if you have no problem.
If you can’t seem to find your balance at first, place your right foot on your shin, instead of the thigh.
The Seated Forward Fold (Paschimottanasana)
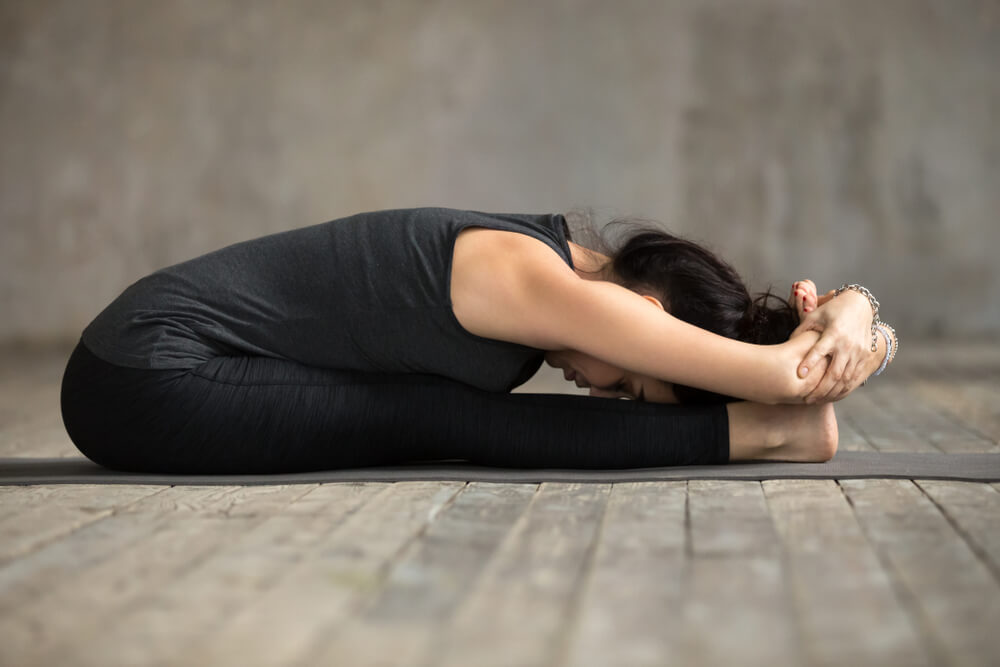
Another great pose for beginners, simply because – you most likely already know, at least partially, how to do it.
That is, if you’ve ever stretched in your life.
It is perfect for unwinding after an intense workout, and it is perfect for unwinding after an intense day.
Here’s how to do it:
- Simply sit on the floor and extend your legs right in front of you.
- Keep your feet firmly flexed. Don’t turn them in or out. Keep your hands by your hips.
- Then, lift your chest and bend forward from the waist. Make sure to engage your lower abdominals.
- Once you’ve bent as far as you can, simply stop and breathe for about 10 breaths. Make sure you are relaxed throughout the pose.
Should you feel any sharp pain at any point, stop. However, if it’s tension that you’re feeling when you bend forward and, more importantly, you can continue to breathe unhindered, your body will gradually loosen up. Tension is normal when doing yoga, but pain is not.
Another option is to keep knees bent, but your feet should remain flexed and together throughout the pose.
The Bridge (Setu Bandhasana)
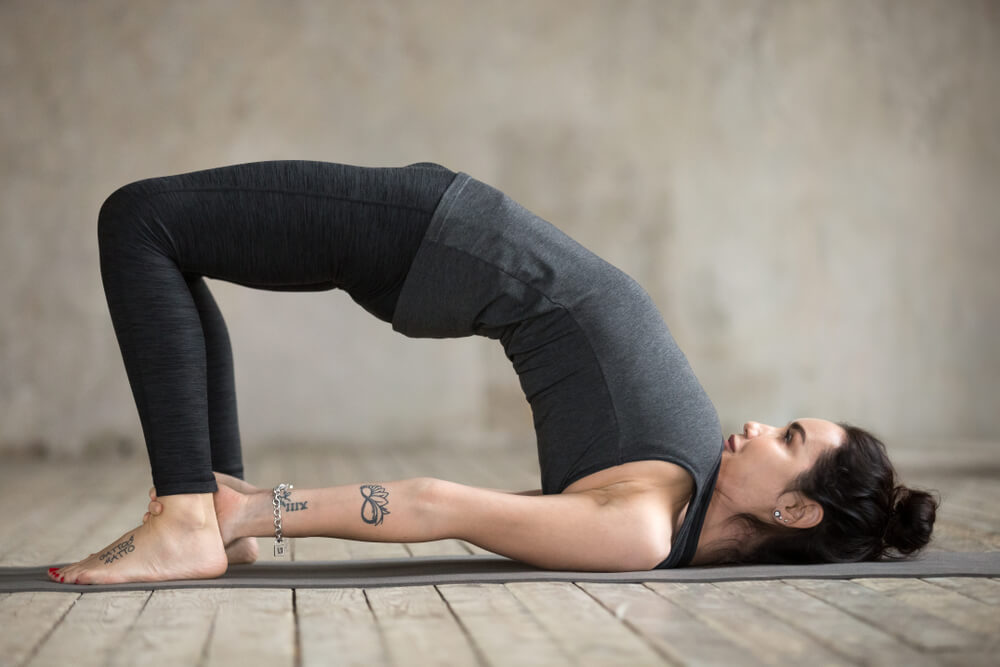
The opposite of the forward bend is the back bend. This pose effectively stretches the front part of your body, while also strengthening your back.
Again, you’ve probably seen it in some form or another. However, this is a good basis for later, more complicated poses.
- First, lie flat on your back.
- Then, bend your knees. Put your feet on the floor, but make sure they’re hip-width apart and that your knees and ankles are placed in a straight line.
- Your arms should rest beside your body and your palms should be facing downwards.
- When you inhale, lift your back. Try to roll in your shoulders so that your chin touches your chest. Your arms, feet and shoulders should support your weight.
- Interlace your fingers. You should also push your hands harder to the ground.
- You can hold this pose for 10 breaths. Lower your hips then and repeat for two or three times.
The Plank (Kumbhakasana)
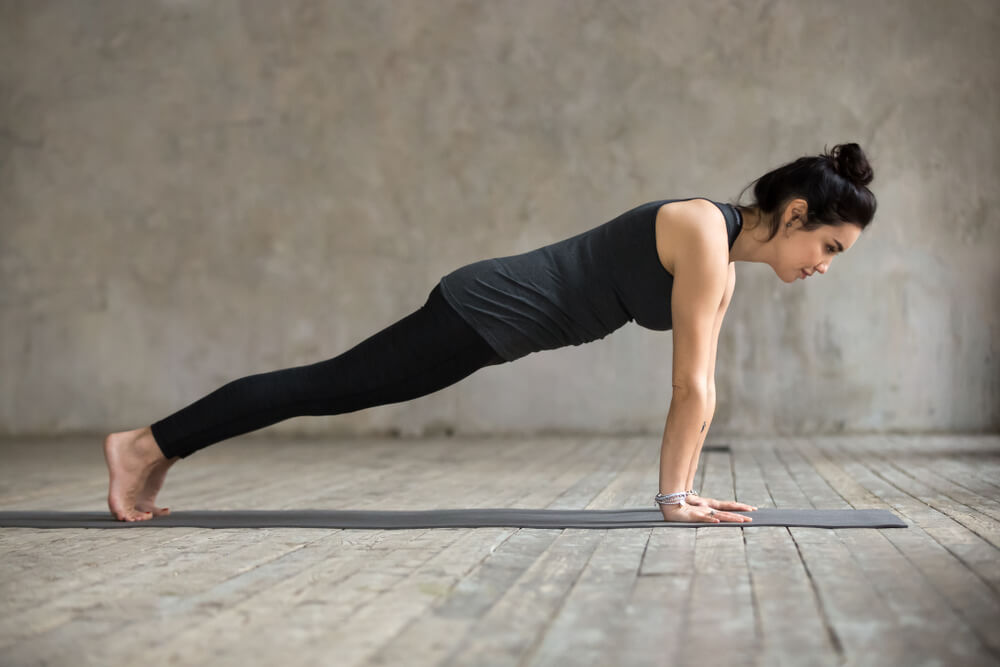
Let’s face it. Many of us are familiar with the infamous plank pose.
Simply because it’s easy to form, it doesn’t mean it’s easy to do.
When it comes to torture in the form of physical exercise, many will testify that planking is right there with pulling a truck with your bare teeth.
However.
Don’t be dissuaded.
Planking is actually so beneficial, that it should be included in every beginner’s routine. It is also the basis for many other more challenging poses that you’ll learn later on.
Now, some prefer going into plank from the downward-facing dog, while others like to keep it simple.
We’re all about simplicity here. (At least until you feel you’re ready for more.)
So, here’s how to do the plank:
- Start on the ground, on all fours. Your knees should be directly under your hips and your hands should be directly under your shoulders.
- Tuck your toes under and lift your knees off the mat. Extend your legs behind you. Your body should form one long line.
- Keep your palms on the floor and core engaged. Your neck and spine should be in neutral position.
- If you can, hold this position for about 5 breaths.
Again, while this may seem like it’s too difficult to hold, start small. Begin with 15 seconds and work from there. You will gradually feel your body strengthening and you will be able to increase its duration to 1 minute.
The Cobra (Bhujangasana)

A simply spectacular pose for beginners. This is when you can feel the stretch, but also give your body a bit of a rest.
The cobra pose is simply perfect if you have a stiff lower back after a day of sitting at the office.
Aside from strengthening your arms and shoulders, it also stimulates your heart, as well as the organs in your abdomen. It also improves circulation of blood and oxygen, which, in turn, has many other benefits.
But how to do it properly?
- Lie on your stomach and stretch your legs.
- Then, spread your hands on the floor, but make sure they are directly under your shoulders.
- Your feet, thighs and pelvis should be firmly pressed into the floor.
- Lift your chest off the floor, but always maintain your pelvis on the floor.
- Firm your buttocks and your shoulder blades, but not too much.
Again, you don’t want to push too hard. Should you feel pain at any moment, pull back a bit, you’ve most likely gone too far.
Child’s Pose (Balasana)
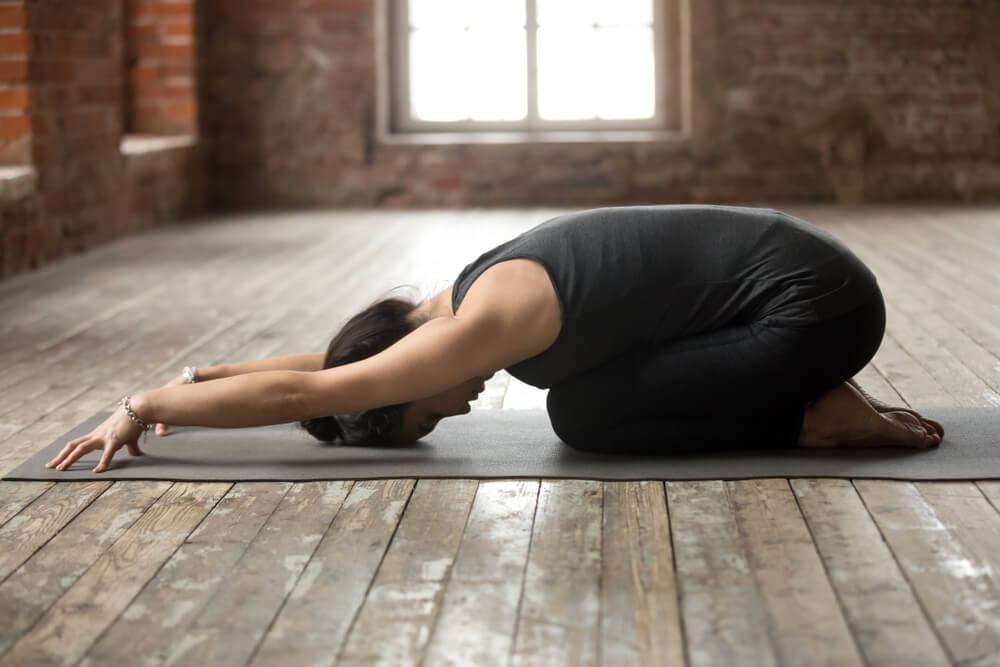
This pose is effective when you need to take a break between two more challenging poses.
It is also great for digestion, and it’s in general calming for the mind.
It can often be neglected on your road to mastering new poses, but it shouldn’t be! You should never push your body without giving it the proper rest it needs.
Remember, it’s all about balance.
So, while you’re striving for those harder ones, make sure to rest now and then.
- Kneel on the floor. Your big toes should touch together and you should sit on your heels.
- Separate your knees to the same width as your hips.
- On the exhale, put your torso between your thighs. Stretch your arms forward and lower your forehead to the floor. Let your body release.
Since this is such a calming pose, you can do it for as many breaths as you feel necessary.
It is great for letting your body recuperate from the stress of the exercise, but also, the stress of life.